Exercise 5
Allow 30 - 45 minutes for Sketchfab activity, and allow at least 2 hours for the optional Unity activity. Processing times may vary according to hardware available.
Planning your outputs: Interactions and Platforms
Now that you have your completed reconstruction of Malthi in Blender, you will undoubtedly have a better archaeological understanding of the site and how the structural evidence could have restricted/allowed movement through different parts of the site. But what do you plan on doing with this 3D reconstruction? Do you plan on making this accessible to the wider public? What type of format do you think would make this most effective?
You should decide on what format the final output will be before you even begin creating your reconstruction, because this will necessitate certain constraints on the size of your reconstruction (and so may dictate how much decimation must take place in Exercise 3). So how do you decide which method to employ? A good place to start is by considering the approaches other archaeological reconstruction projects have taken. Do you need 2D captures of the 3D reconstruction for paper publications or information boards, as some of Bob Marshall’s reconstructions have? Do you plan to produce a fly through video of the reconstruction, as those produced by Open Virtual Worlds for the Edinburgh 1544 project? Will this be at human eye-level to enable a more ‘lived’ or ‘real’ experience of the site (Watterson 2012) or from a bird’s eye view to feature the surrounding landscape?
Another option is to make the reconstruction navigable through an online platform, either through a 3D viewer like Sketchfab (with informative hotspots attached, like the Rosewood Cemetery, or without, like the Nefertari Tomb), or through a photosphere tour website like Roundme (also employed by Open Virtual Worlds to reconstruct the Moredun Hillfort the CINE project’s reconstruction of St Catherine’s Church in Killybegs, Donegal). By controlling viewpoints, this can in some cases limit the amount of reconstruction that you need to do.
While not necessary for some of these outputs, like Sketchfab, often game engines are used as a way to house archaeological reconstructions and to make these available to a wider audience.
- Unreal: Open Virtual Worlds uses the Unreal engine to produce virtual reality experiences, videos and photospheres.
- Unity: The Villa Livia Reloaded exhibit utilised Unity. In-browser 3D experiences require some knowledge of WebGL (Papadopoulos and Schreibman 2019), but this is needed to create both Unity and Unreal engine-based experiences in browser. Without WebGL, these reconstructions would be limited to desktop interactions, though they can be made downloadable from the internet for installation.
- Godot: Other game engines can also be used to create Augmented Reality or Virtual Reality experiences, like the Godot engine, but Unity and Unreal’s prevalence means that there are more online tutorials and videos regarding these game engines.
- If working in a team with a software developer, or if you have experience in developing software, you can develop your own in the way that the University of Dundee’s 3DVisLab did for the SERF Hillforts Project (Watterson et al. 2020).
- There are a number of other 3D visualisation tools that may be useful in certain situations, such as the 3DHOP viewer, Europeana Pro’s V4Design or their Share3D web application.
Think and Respond: Regardless of which tools, game engines, or websites you utilise to deliver your reconstruction, you need to have a good understanding of what is possible through each of these options. Let’s consider the ‘MoSCoW’ approach introduced in Exercise 2 and add to your Design Document. Examine the example projects above; what features do you see in these examples? Which of these features are ‘must haves’, ‘should haves’, ‘could haves’, and ‘won’t haves’ when you consider your reconstruction of Malthi? For example, do you need transparency options to make it clear which components are your reconstruction, and which originate from 3D records? Do you need to show multiple phases of the site in a single application, and how will you shift between these? How will ambiguity be portrayed? These are all things that need to be considered before the project gets started, and preferably before your first meeting with any project partners.
This exercise will walk you through using the basics of two platforms that you may wish to use for your reconstruction: Sketchfab and Unity. The Unity portion of the exercise is optional.
Sketchfab
Sketchfab is a website (purchased by Epic Games in 2021) that allows you to create a free account to upload your 3D models and assets for people around the world to view, download, or purchase. Sketchfab provides a number of features that are particularly useful for archaeologists, especially the ability to add ‘Annotations’; these are markers that you can attach to a specific point in the 3D scene to provide explanatory text. Sketchfab also has its own VR/AR platform available, though it is less flexible when the ‘ground surface’ is not flat. However, it is important to note that Sketchfab, like all commercial platforms, is not an archival solution. Once the data is on Sketchfab, there are no guarantees that Epic Games will preserve your data for any amount of time, nor will they ensure its accessibility; the archival of digital datasets will be addressed more explicitly in the Additional Archive Materials.
Before you upload your 3D model to your Sketchfab account, you need to be sure that you are adhering to the file size limits of your account type. For a Basic Free account (as of 2021), you are allowed 10 uploads per month, a file size limit of 100MB per file, and 10 annotations per model. This free account should be sufficient for this project.
Now, let’s look at the export you produced earlier. What size is the file? If you find that it is more than 100 MB, determine how much smaller the file will need to be. One half the size? Three quarters of the size? You may also want to take into account whether you want to create a VR experience or not – Sketchfab recommends that 3D models contain less than 50,000 faces to optimise it for VR, which may be a good benchmark to aim for, but your results may vary. Ideally, you should decide your ideal file size before generating normal maps; you will see in later steps that decimating your model now will affect how well the normal maps sit on the lower-resolution geometry.
Decimating in Blender
To decimate your 3D model in Blender, first open your Blender project and turn off all layers except for the meshed laser scan data. Ensure it is highlighted in the Scene Collection, then navigate to the object’s ‘Properties’ below, to ‘Modifier Properties’, and select ‘Decimate’.
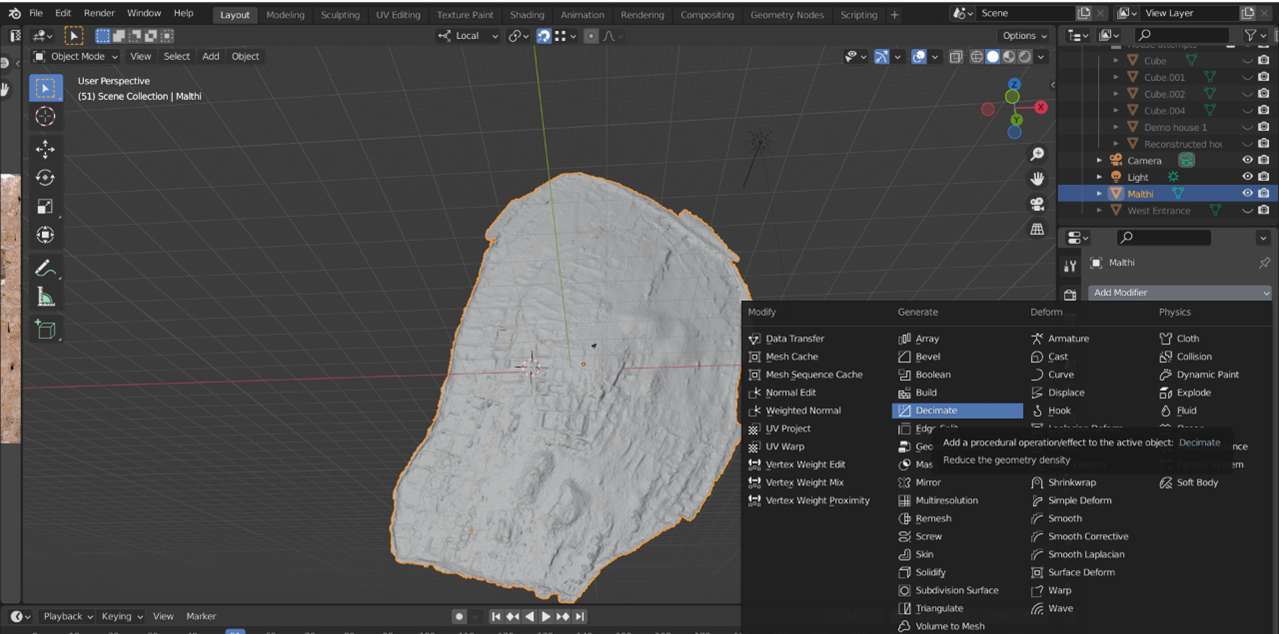
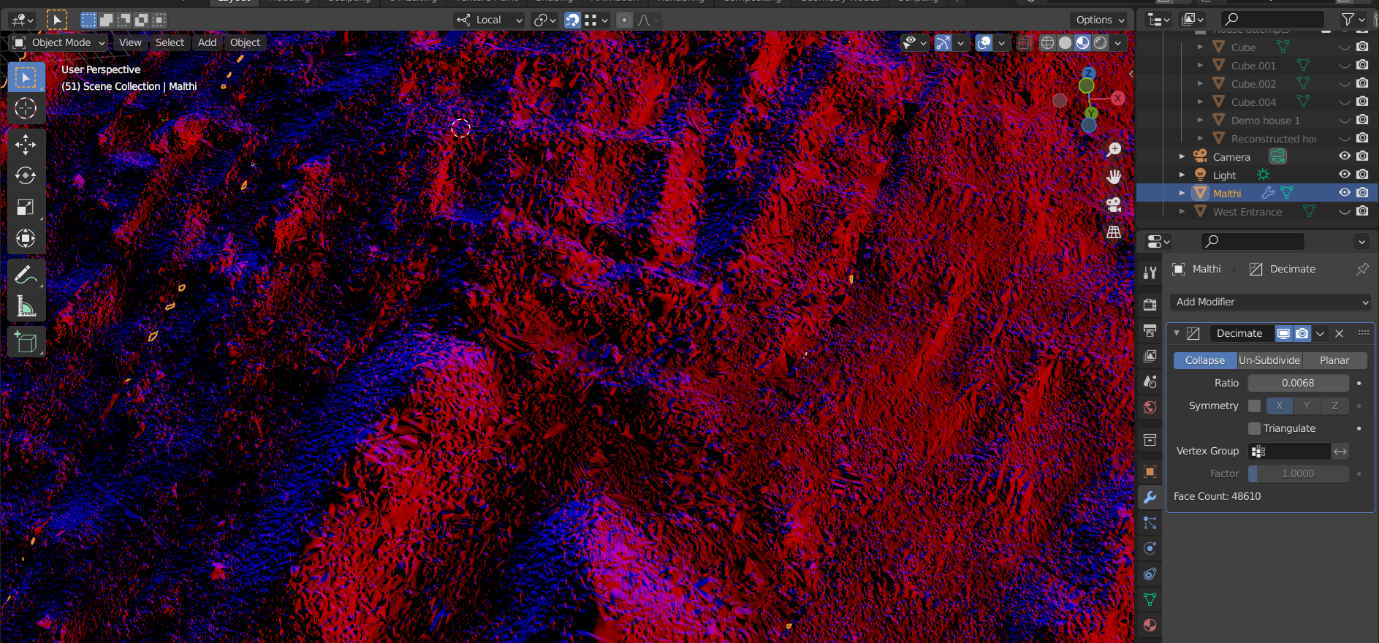
Next, take note of the total number of faces in your mesh. Right now, it has over 3.5 million faces (highlighted in the red box below). To get to our target of 50,000, we will need to decimate the mesh by using the ‘Ratio’ bar – click on this and type in a number between 0 and 1.
Try it yourself! Try changing the ratio a few times – what do you notice about the quality of your mesh after each decimation? Be sure to turn on the ‘Viewport shading’ (highlighted with a white box below) to see how this affects the quality of your normal map. Are there any obvious differences?

It may take some trial and error, because changing this to 0.014 will not get you 50,000 faces exactly. It turns out that 0.0068 may lead to a better estimation of 50k faces.

However, you may notice that, now that you have decimated the mesh, the normal maps are not interacting with the underlying mesh in the same way. There is now some texture ‘tearing’ or creating a ‘stretched’ effect in some places. If you think back to Exercise 3, normal mapping is essentially ‘painting the detail’ from the high resolution mesh onto your low resolution mesh. By changing the geometry of the low resolution mesh through decimation, faces that would have been ‘painted’ with certain details are now missing, which affects the quality of its appearance.
Ideally you would avoid these issues by knowing the file size limitations of the platform you want to use to disseminate your output and the number of polys to which the mesh would need to be limited. However, if you were to run into this problem in a real world project, you would need to go back to the individual Blender files you created in Exercise 3, decimate the low-resolution versions of each mesh further, and then re-bake the normal maps onto this lowest-resolution mesh.
Once you are happy with your decimated mesh and the other components of your reconstruction, you can export these as a single file. Sketchfab will accept a variety of file types, including .FBX, .OBJ, and even .BLEND. Check once again that your file size is less than your Sketchfab account’s upload size limit.
Upload to Sketchfab
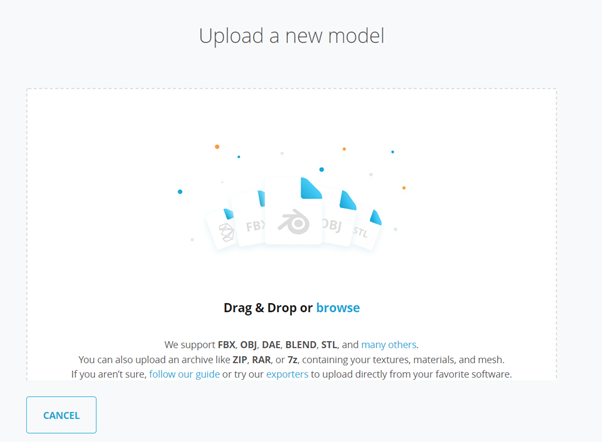
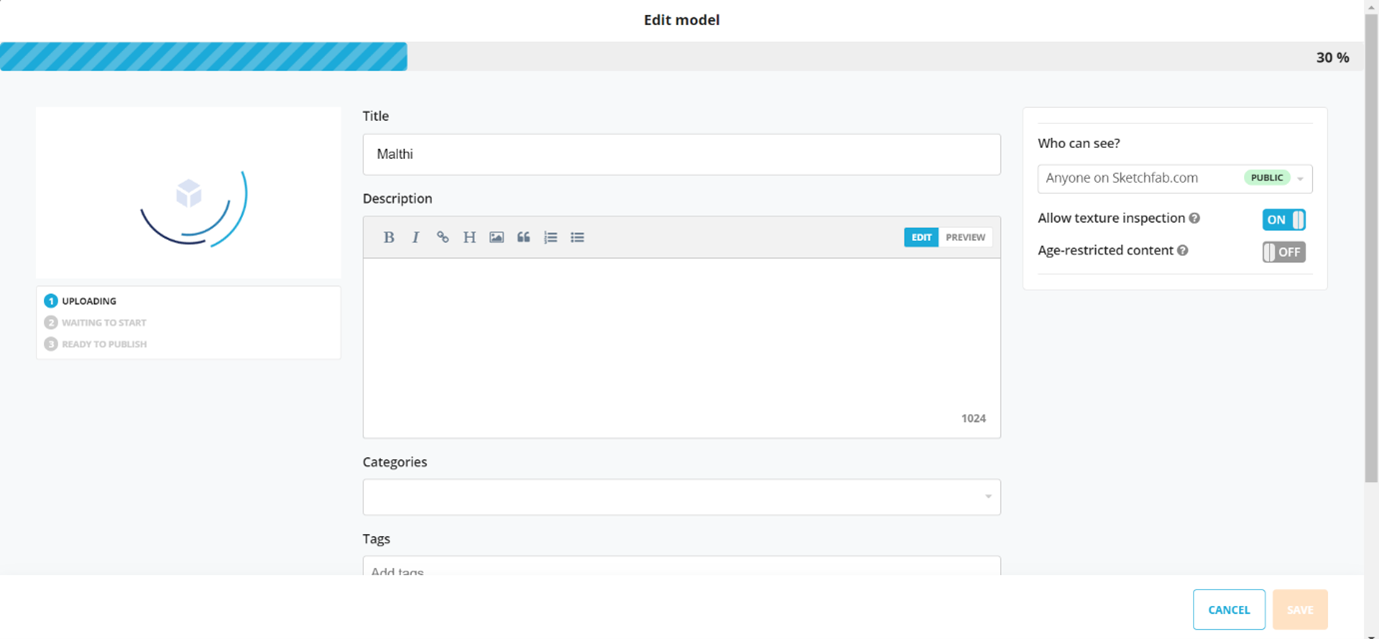
Now you can log into your Sketchfab account and navigate to the ‘Upload’ button. As shown in the image above, you can either drag and drop your finished files to the page, or browse to the files where they are contained. This will now begin to upload and process your files. While waiting, you can begin to make some decisions. If you are on a free Sketchfab account, you will likely need to keep the model ‘Public’, though no one will be able to see the model until you hit the ‘Save & Publish’ button. If you choose to allow ‘texture inspection’, this will allow the public to inspect any the textures you upload with your reconstruction. You can create an informative description to accompany your reconstruction to provide context. You can assign your model a number of categories (including Cultural Heritage & History) and tags to make your reconstruction more easily discoverable via Sketchfab’s search function.
Think and Respond: What types of information do you think are important to include in the Sketchfab description for your reconstruction of Malthi? What archaeological information would you include, given the 1024 character limit? What information would you provide about the source of the laser scan data? The paradata/choices you made in creating your reconstruction? Any other information?
Editing 3D Settings
Now you can edit the reconstruction’s 3D settings, ie. how the 3D model will appear in Sketchfab’s 3D viewer. While there are settings and visualisation tools that may not be relevant to your reconstruction (like the ‘Animation’ tab), there are many that are worth experimenting with that we may not cover. We will, however, go through the basics.
First, under the ‘Scene’ tab, find the ‘Show advanced rotation’ checkbox under ‘General’ and enable it. Even if you exported the Blender file with the wrong orientation, this will be easy to remedy – use the ‘Straighten model’ tool to align your reconstruction intuitively (in this case, the model needed to be rotated by 90 degrees on the X axis). Bring the ‘floor’ of the 3D space (the wireframe rectangle under your mesh) up until it is just below your reconstruction by left-clicking and dragging the blue arrow pointing up.
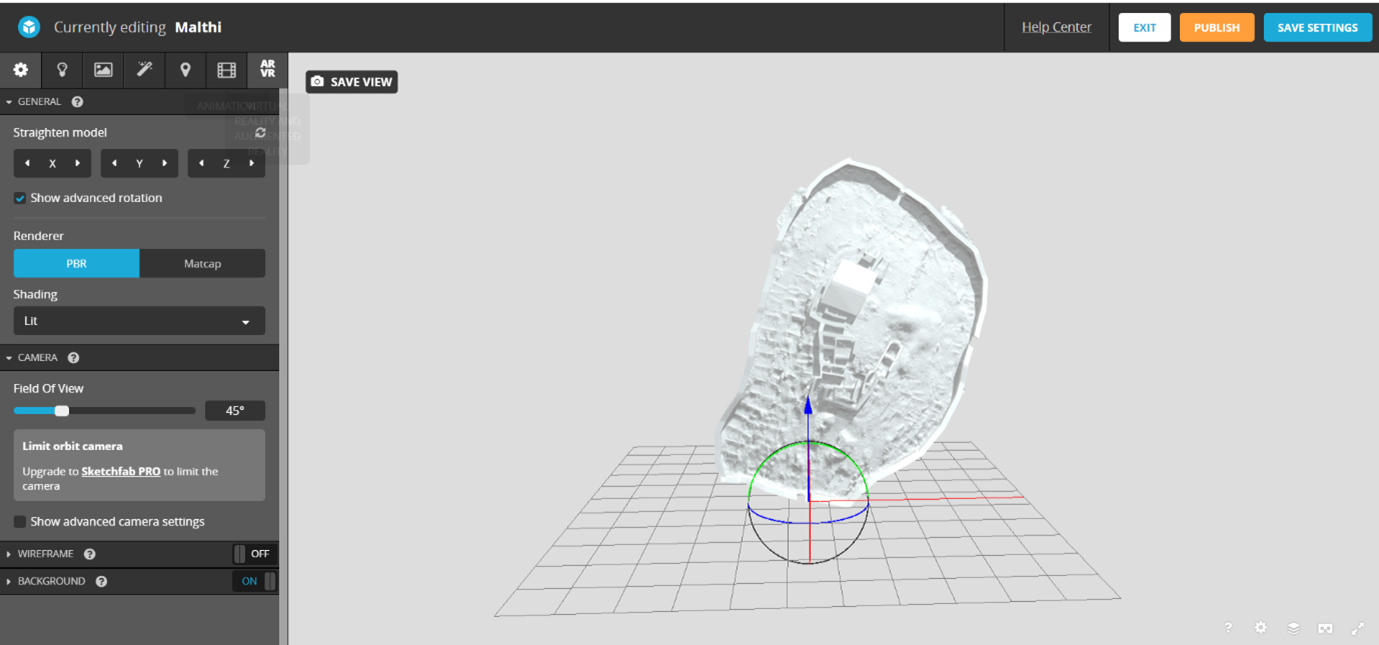
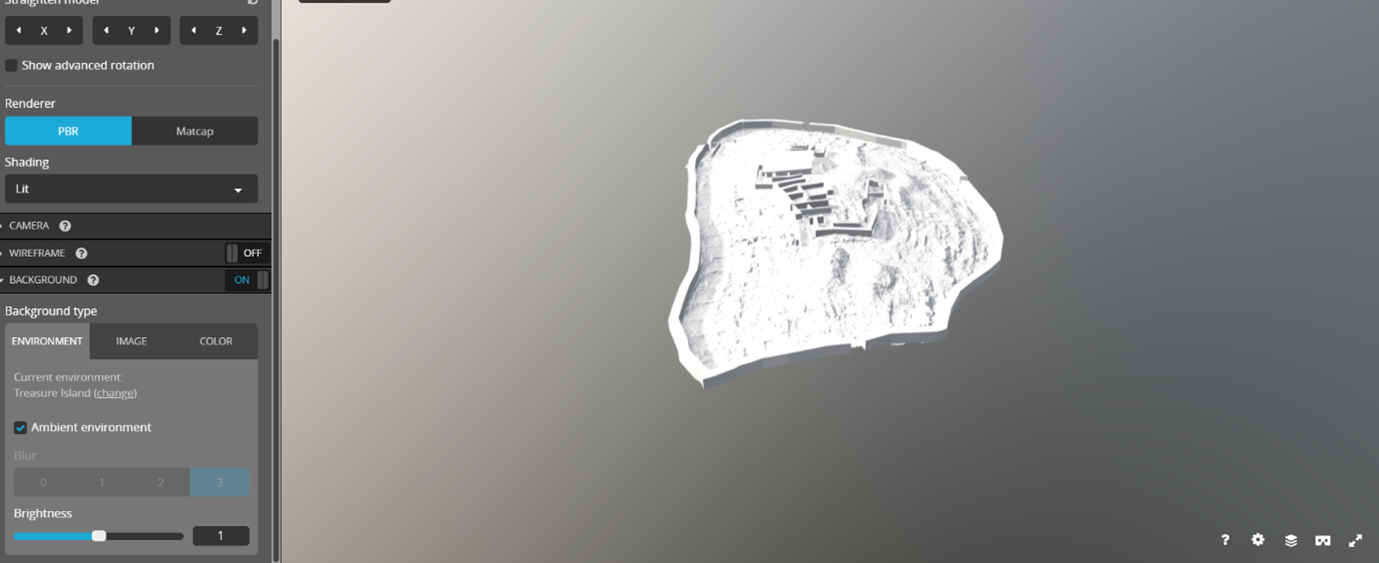
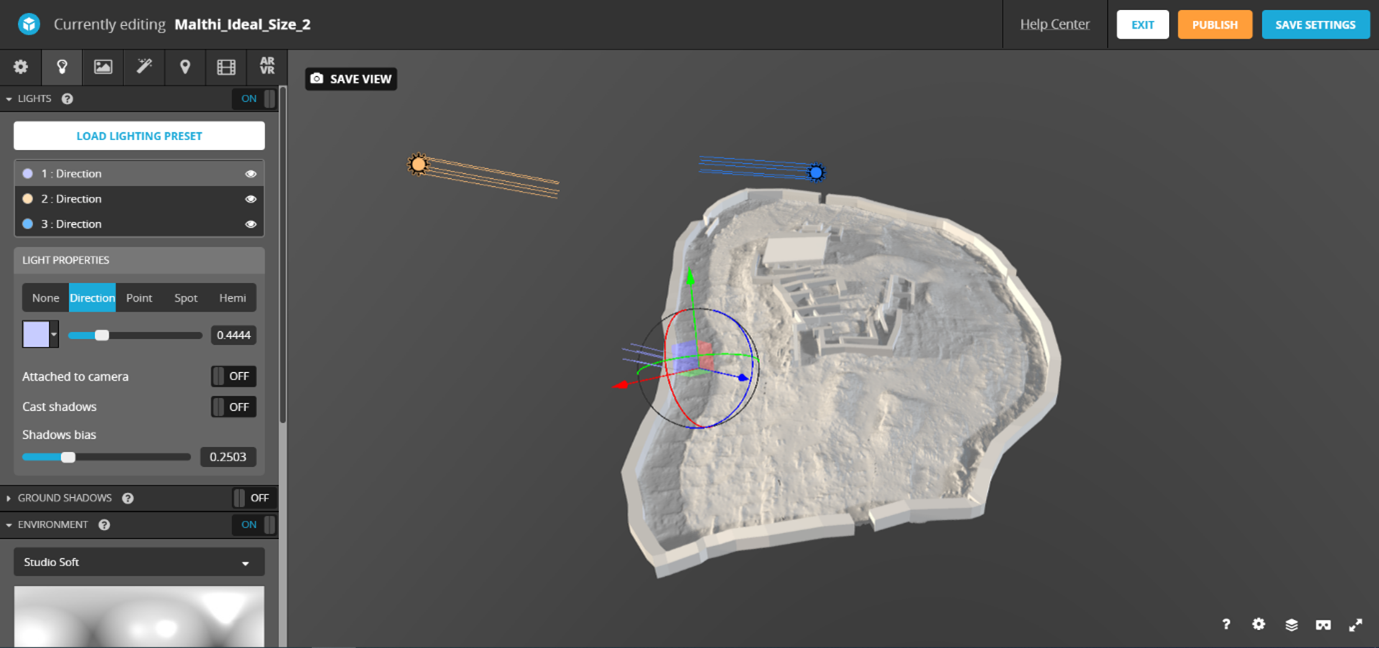
You may wish to change the background of the scene, either to a pre-set environment, an image, or a basic colour. As long as you have the Renderer set to ‘PBR’, you can also edit the brightness, intensity, and positioning of the lights to simulate realistic lighting.
Normal Maps/Textures
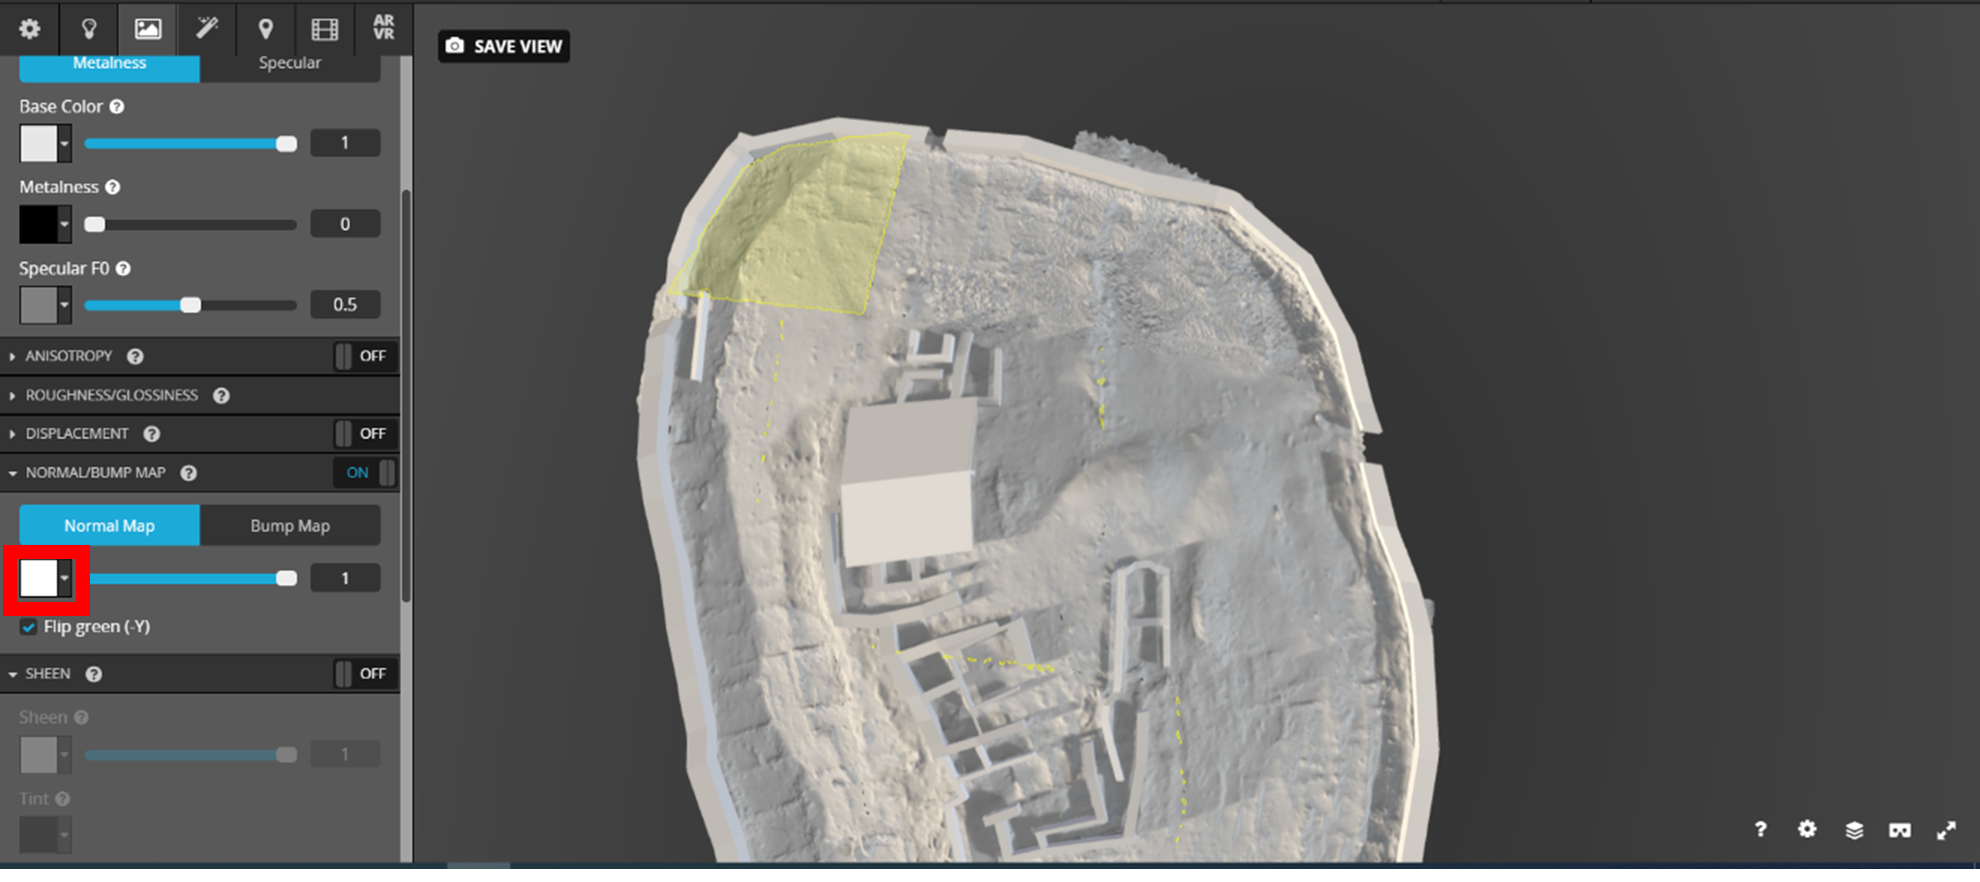
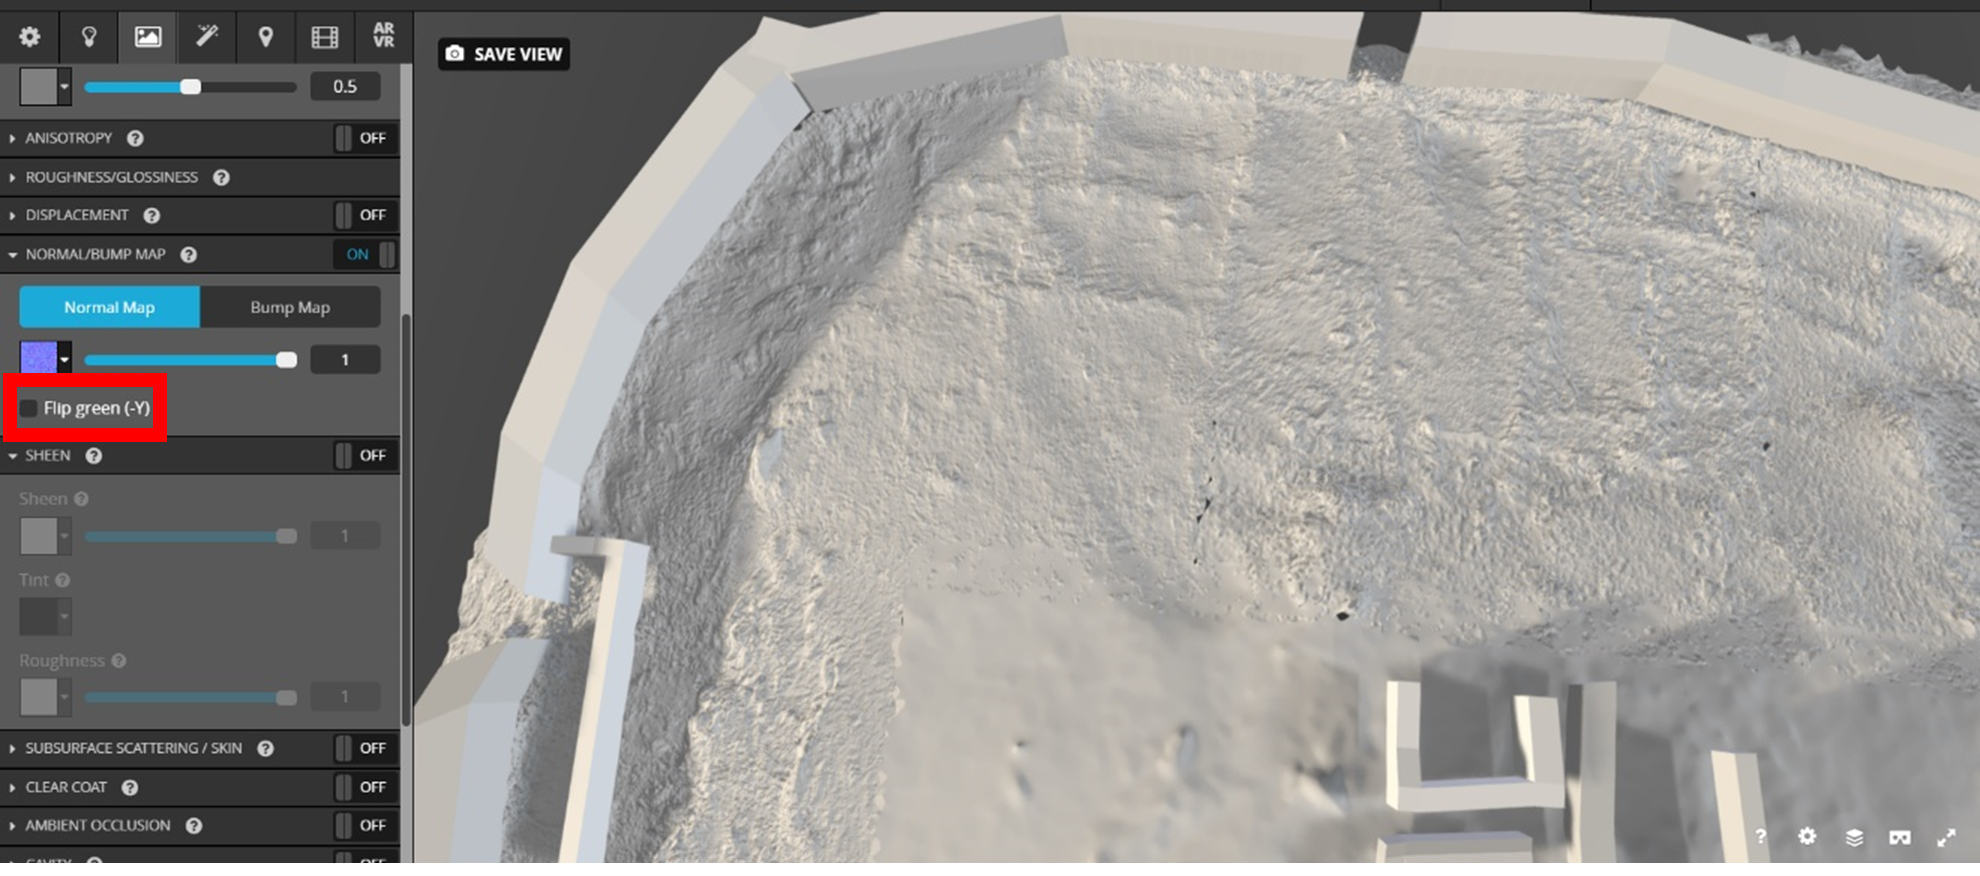
The next important step is to add your normal maps to your reconstruction so that the detail from the high resolution dataset is still intact. However, each of these must be applied manually and to the correct section of the 3D model. On the ‘Materials’ tab, turn ‘on’ the Normal map. Then, click the drop down arrow highlighted with a red box in the image below, and then ‘Import Textures’. Navigate to the folder where your normal maps are housed and import all of your normal maps.

Now, click on the first subsection of your map (highlighted in yellow below) and select its corresponding normal map from the drop down menu (surrounded with a red box below). It is likely that the normal map will look strange at first – simply uncheck the ‘flip green -Y’ checkbox and the detail should return to your laser scanned dataset. Repeat this for each subsection of the laser scan data that you have included in your site (this is why it is important to name each of these files sensibly!).
Finally, you may wish to add hotspots to your reconstruction, so that you can provide specific information about individual features, or reasoning behind your reconstruction.
Think and Respond: Which features are of note in your reconstruction? Are there specific access routes you identified through the process of reconstruction? Are there certain areas limited to specific activities, like administration, or metalworking? Which of these are particularly important to highlight on the model itself; are some difficult to describe through just the ‘description’ box? Make a list of 5-10 annotations you would like to make on this 3D reconstruction and add it to your ‘Design Document’.
Annotations
Annotations are notes that you can place in the 3D scene to explain specific features. When a user switches between annotations, the 3D model will rotate and zoom to show the view you selected just before creating the annotation. This can be quite useful when discussing movement through a space or site.
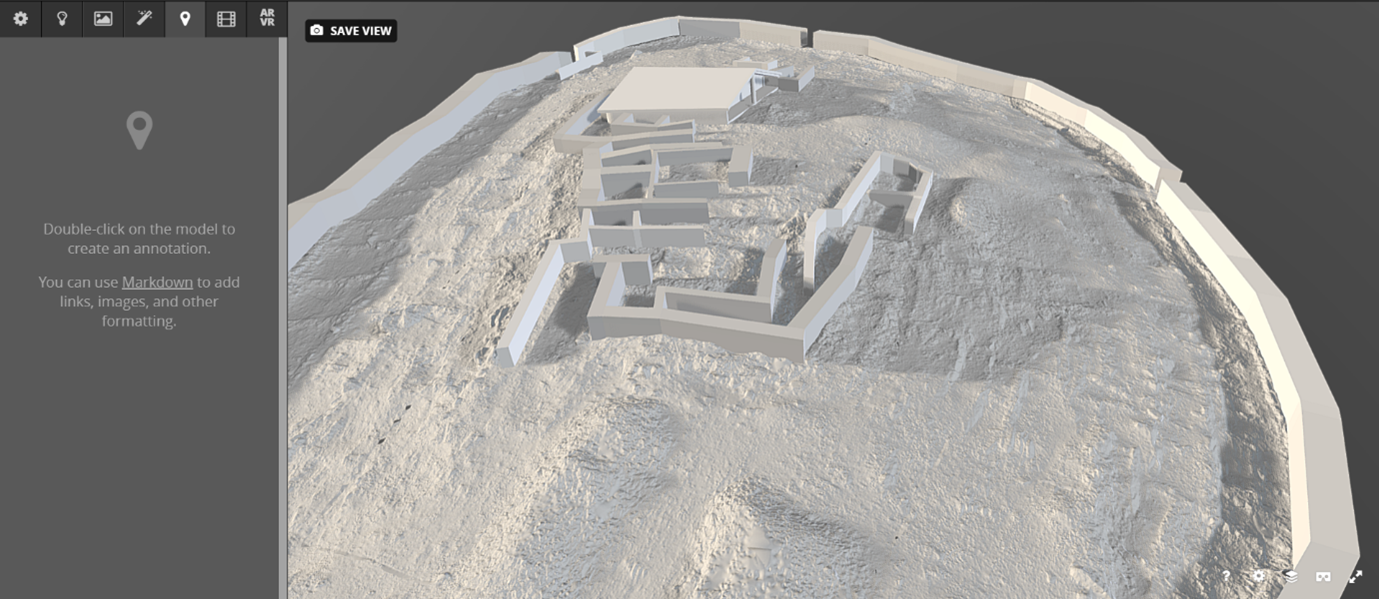
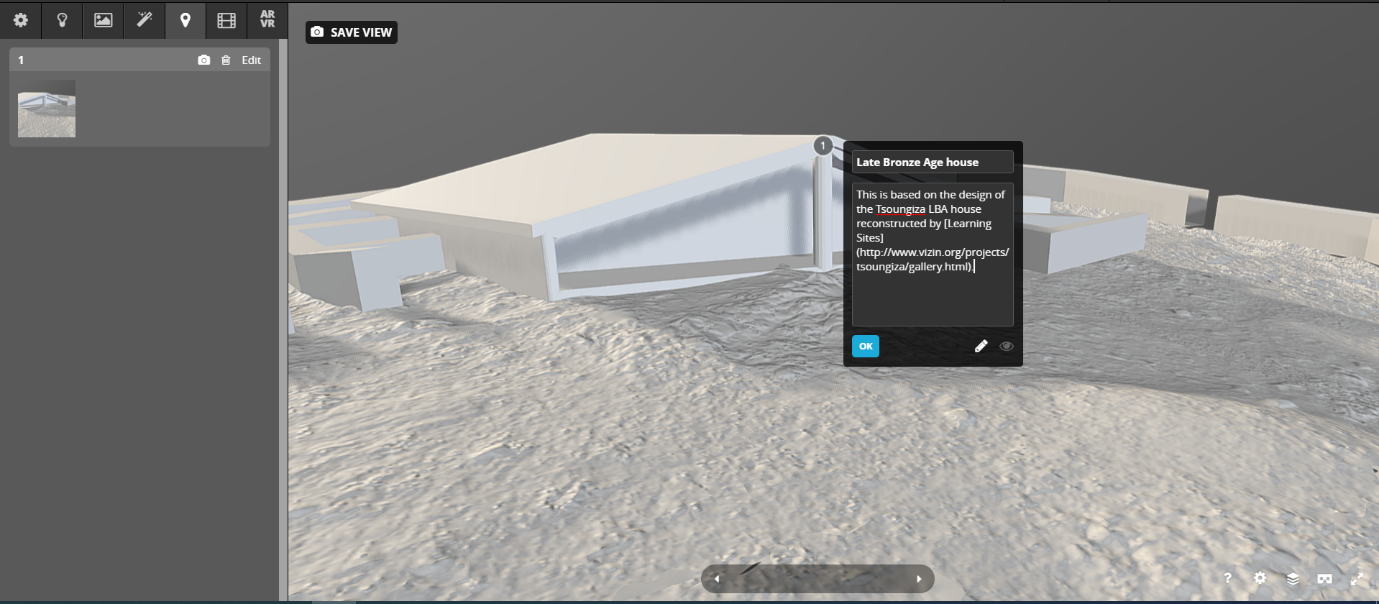
For example, let’s highlight our reconstructed house from Exercise 4 and mention in the annotation that this was based on the reconstruction of a Late Bronze Age house at Tsoungiza. First, navigate your 3D model (left-clicking and dragging to rotate, right-clicking and dragging to pan, and using your scroll wheel to zoom) so that the reconstructed house features prominently in the viewer. Then, double-click where you want your annotation to sit on your 3D model. Notice that in the top left corner, a screenshot of your current position has appeared, and a text box has appeared next to your new annotation.
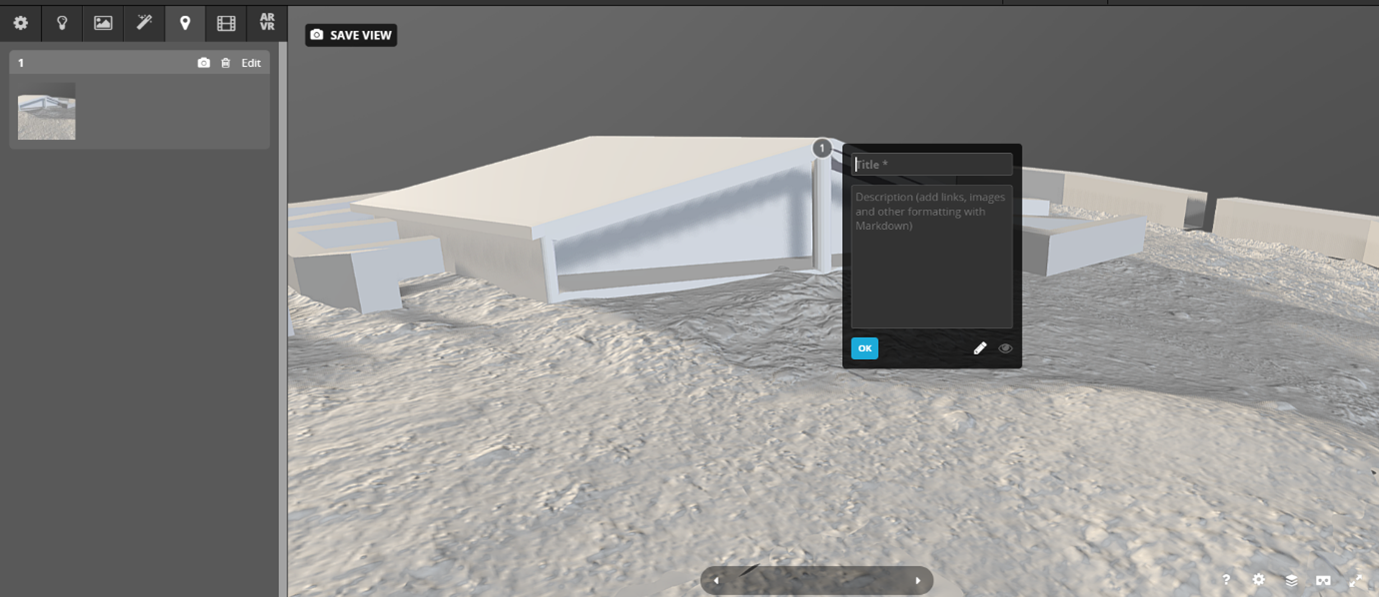
Add a title and the necessary information. Note that you can use Markdown syntax to alter your text, like adding a link to the original Tsoungiza reconstruction. Click OK to save your annotation.
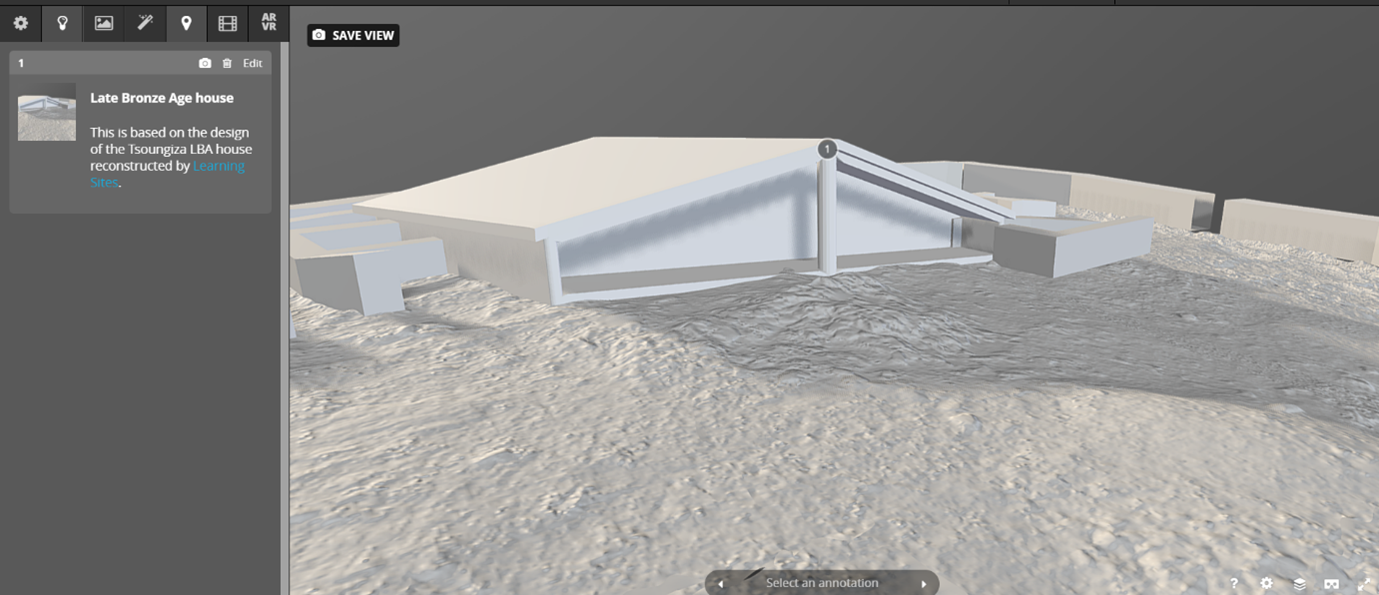
After you’ve saved your annotation, notice that the annotation on the left has been updated with this information and formatting.
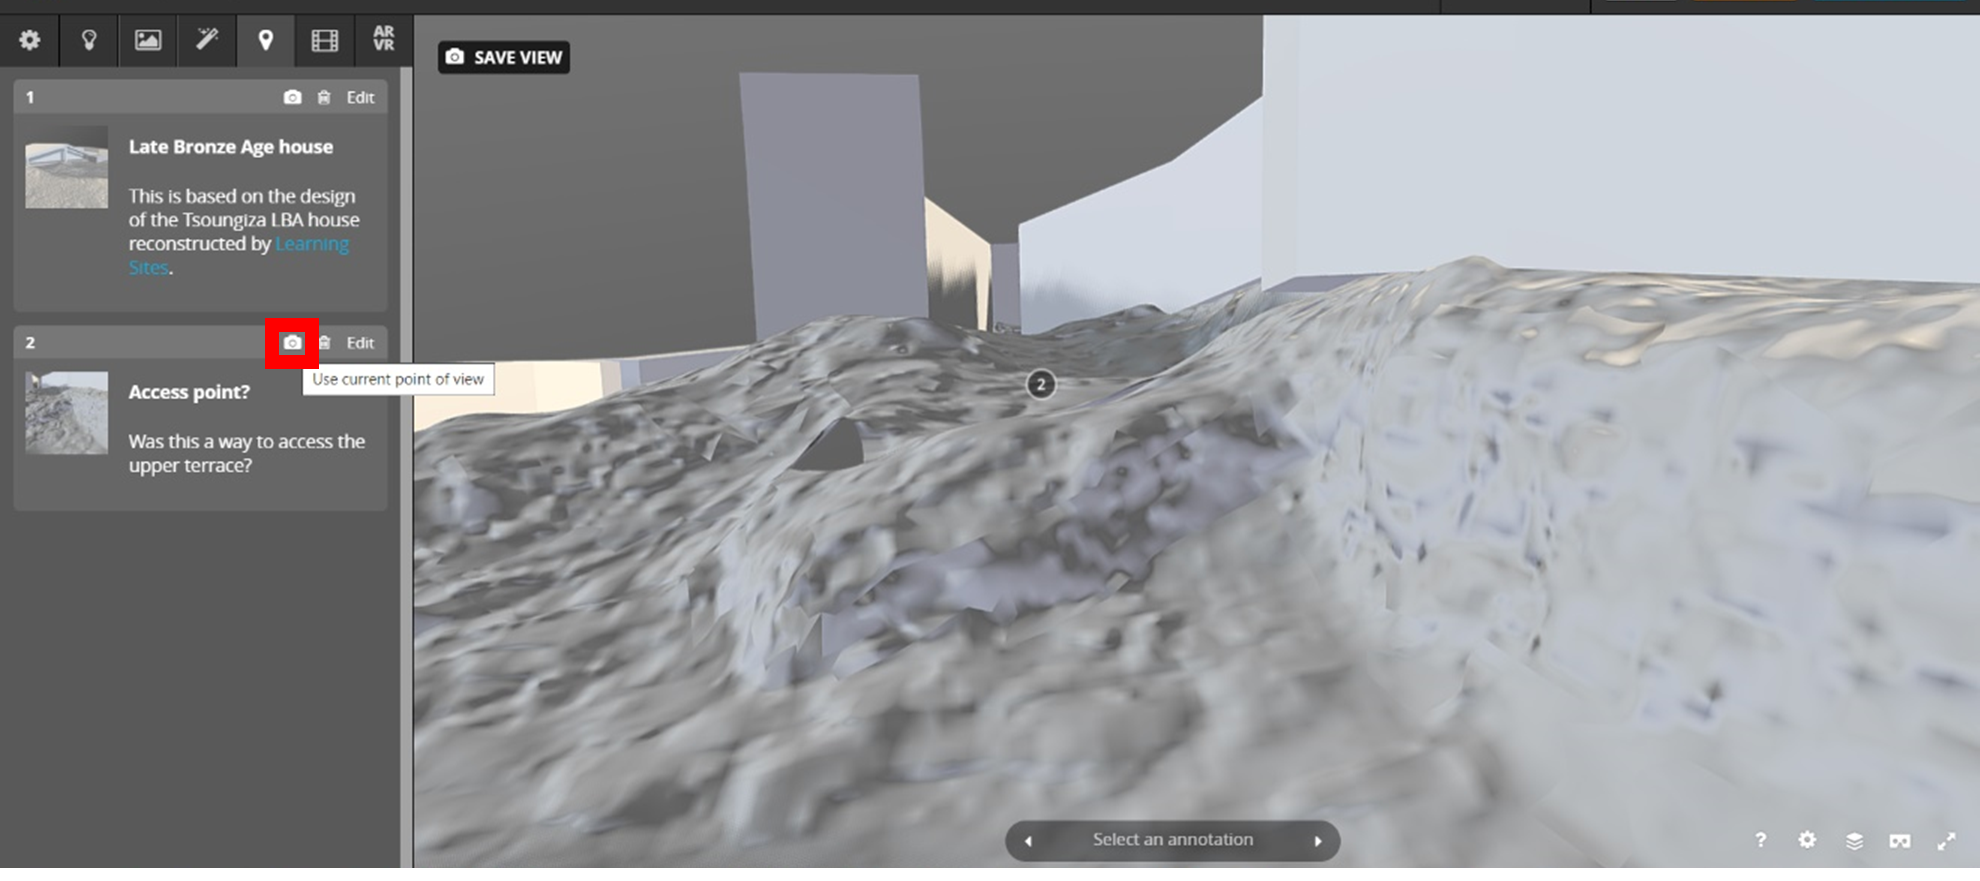
If you want to change the view associated with the hotspot, simply create the view in your viewport, then click the small ‘camera’ button next to the annotation to be updated (highlighted with the red box below). This can be an easy way to highlight specific routes/views/pathways without needing a VR application.
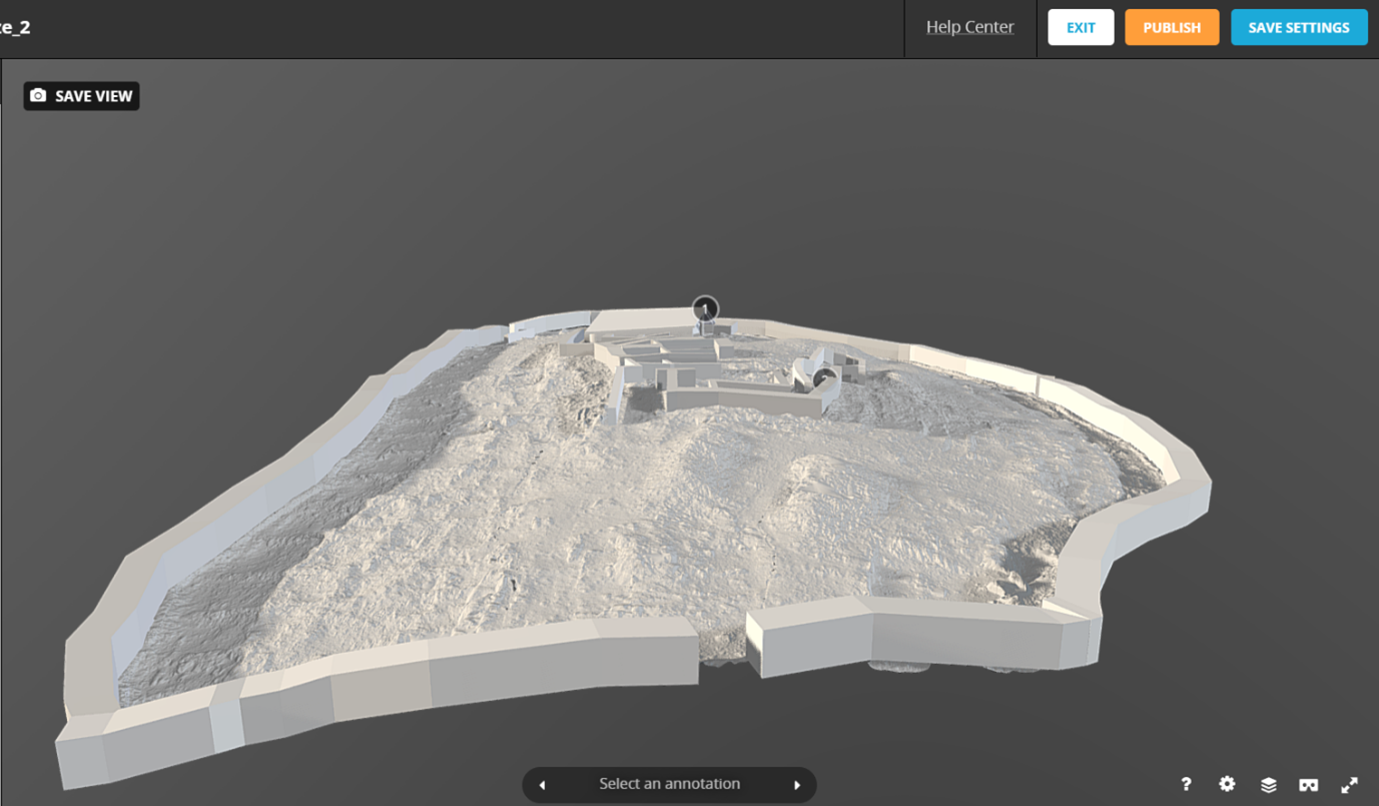
After you’ve finished with your model, annotations, and settings in Sketchfab, you can simply press ‘Save Settings’, move your 3D model to your desired starting position for all viewers and press ‘Save View’. You can either ‘Exit’ to edit your ‘Description’ further, or ‘Publish’ your 3D model.
Your final decision is whether or not you want to make the 3D model downloadable (for free or for a fee) or not. This will largely be decided by the lead members of the project – are there copyright issues to take into account? Is ‘Open Access’ a key underlying principle of the project? Is this designed as part of a fundraising campaign to support future excavations?
Once your 3D model is ready, click ‘Publish’. This is now a shareable 3D reconstruction that can be viewed by millions around the world!
Think and Respond: Does the Sketchfab approach seem quite simple? Effective? Does this qualify as interactable? Are there any issues you can think of to use Sketchfab on a long-term basis? Does this approach meet the project aims/requirements set out in Exercise 1? Why or why not?
| Go back to Exercise 4 Part C | Go to Exercise 5 Part B (Optional Activity: Unity) | Go to the Conclusion |